
 | 

|


| Content | | | Introduction | | | Control center | | | Library | | | Routine | | | Stage | | | Movie | | | Technical |

 |
 |
 |
 |
 |
 |
| The window |
 Defining the poses of characters
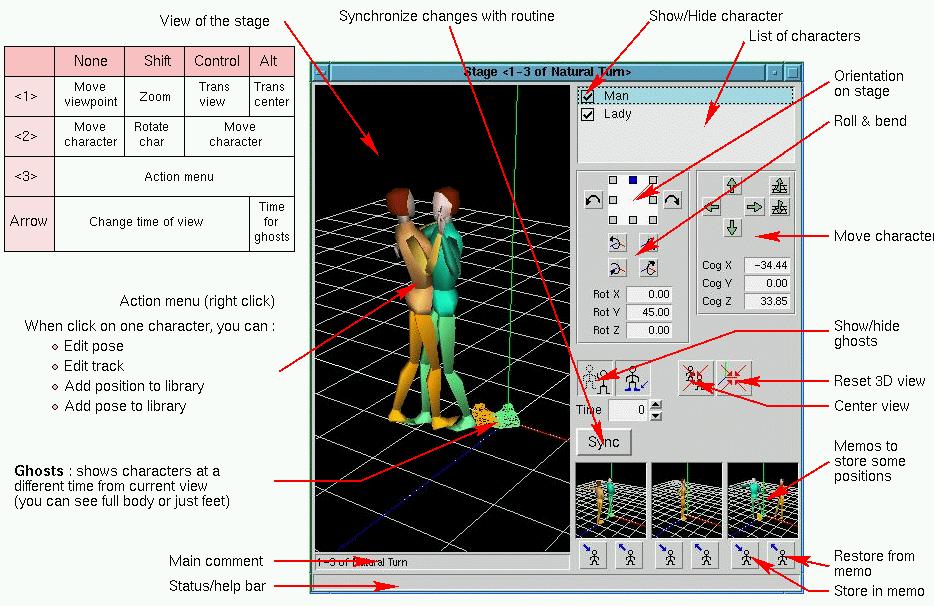
The Stage window allows you to define the keyframes of your routine.
With this window, you can :
- move the characters on the floor.
- rotate the characters (orientation and roll and bend).
- change the pose of one character (right click on it and select Edit Pose in the popup menu).
- view the tracks of one character (right click on it and select Edit Track in the popup menu).
- define a position in the library (right click on it and select Add position to library in the popup menu).
- add a pose in the library (right click on it and select a cataegory in the submenu Add pose to library in the popup menu).
The 3D view can be switched to an other viewpoint (top, bottom, front, back, left or right).
Once you have edited the stage (positions and poses of the characters) and want to record them in the routine, just click on the Sync button. This will synchronize the position and pose for the edited time. If you define new keys, they will then appear in the Routine Editor window. Using the keyboard
When using the buttons to move, change orientation or bend/roll a character, you can :
- simply click on the button.
- click while maintaining the Shift key to do smaller increase or decrease.
- click while maintaining the Control key to do even smaller increase or decrease.
The ghosts are a sort of shadow of your characters. They allow you to view the pose of your characters at a different time.
As you change the main time using the arrow keys, you change the time of the ghosts using the Alt-arrows keys or giving a specific time in the box labeled Time.
You can :
- activate or desactivate the viewing of the ghost by clicking on the icon.
- choose to view the full ghost or the feet only by clicking on the icon.
 |
The ghost are very useful when editing a step : to be sure you character is not splipping, just set the ghosts time at the begenning of the step. Then when you change the main time, you can see if the step remain at the same location than the beginning of the step. |
| The Memos |
To use a memo, it is simple :
- click on the left button to store the poses into the memo.
- click on the right button to restore the poses from the memo to the stage.
 |
To join a figure you are editing, store the last poses of the characters in one of the memos and paste them at the beginning of you new move. |
| The Pose Editor |

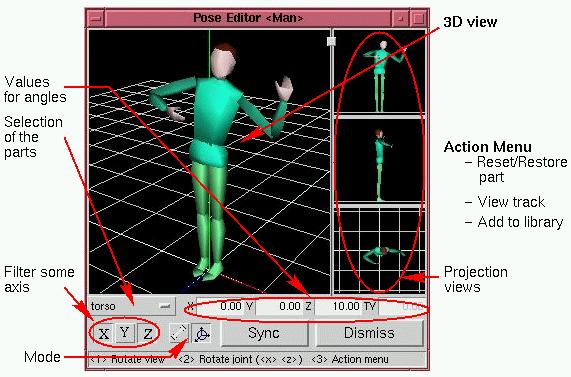
The Pose Editor window allows you to define a pose for a character.
To set a limb or part of body, just click on it with the left button and drag the part. This will roll and bend it (rotation around X and Z axis).
To twist the part, just press Shift before to click on the part. This will rotate the part around the Y axis.
 |
When you click on a part to roll/bend it, the value for the Y axis is reset to zero.
This is to avoid strange composition of rotation (as combining the rotation around
the three axis can become complex).
To avoid this, hold the Control key before to click on the part : the rotation around the Y axis will not be changed. |
The filters are used to filter the rotation around some axis. When the button is pressed, the rotation around the axis will be shown.
Right clicking of the view will popup a menu to :
- reset the joint : all the angles will be set to 0.
- restore the joint to the value for the edited time (either a value given by the user if this is a key, or the interpolated value if between keys).
- view the track associated with the joint (see below).
The three options above will only by available if you click on a part of the body - add the pose to the library by using the submenu to select a category.
This will popup a window to define the pose more precisely :- give a comment to your pose. This comment will be shown when browsing the library (see Library window).
- select the part to record as the pose in the list on the right. The parts selected (and which will be used later) are shown in yellow.
- define the icon : the view on the left part of the dialog shows the icon
as it will appear in the Library window.
This small view use the same bindings as the main 3D view in the Stage window : just play with it to define the best viewpoint.
| The Track window |

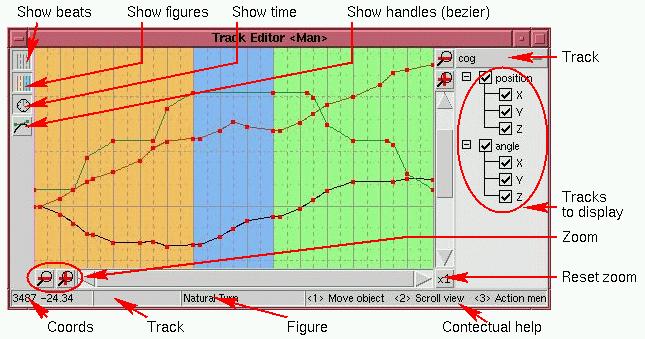
This window allows you to do fine tuning of your moves.
You can see the "raw data" as used by Gepetto. Each angle of each joint is shown separatly with the interpolated values.
Showing the handles and moving them, you can change the way the interpolation is done.
More to write here ...


Copyright © 2000 Laurent Riesterer.
Last modified on Aug 14, 2000.