

 | 

|


| Content | | | Introduction | | | Control center | | | Library | | | Routine | | | Stage | | | Movie | | | Technical |

 |
 |
 |
 |
 |
 |
| The window |
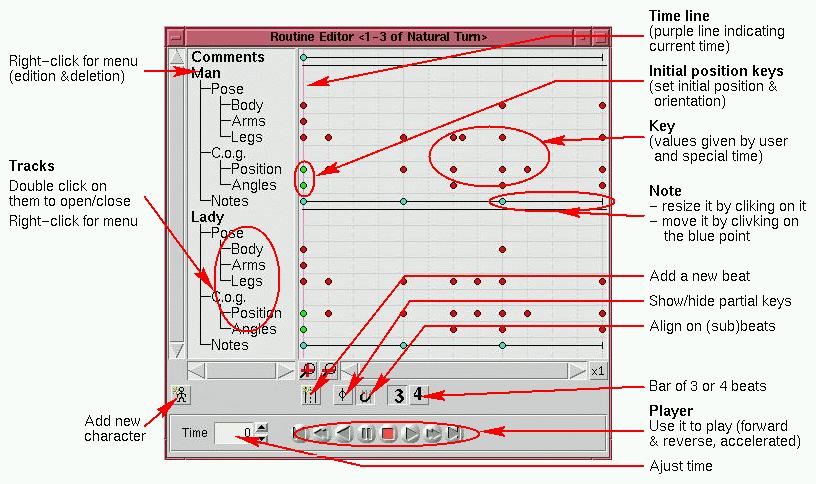
The figure above shows you all the components of the Routine Editor window.
The only parts not described are the two icons used to zoom the window, the plus is used to zoom in , the minus to zoom out. Use the icon with the "x1" label or the Return key to force the window to show the whole time range.
The popup menu for the Tracks give you the choice to :
- expand the branch. The leafs of the tree are shown in blue and
represent the joints and position of the character.
The tree for the joints is :
- Body
- Head
- Torso
- Pelvis
- Arms
- Left arm
- Shoulder
- Elbow
- Wrist
- Right arm (same thing)
- Left arm
- Arms
- Left leg
- Hip
- Knee
- Ankle
- Foot
- Right leg (same thing)
- Left leg
The tree for the position, called Cog (Center of gravity, rooted at the pelvis), is :
- Position
- Floor
- Altitude
- Angles
- Orientation
- Roll
- Bend
- Body
- collapse the branch.
- delete the tracks associated to the branch.
When some figure are defined in the editor, it will look like this :

(we have shown the partial keys)
Each color represent a figure. To know the name of the corresponding figure, just stay a few moments with the mouse on the figure and a small window will appear with the name of the figure.
To change the color of a figure, right click on the figure and use the popup menu.
When the figure defines only some tracks, the defined
parts are showns proportionally in the collapsed tree.
For example, in the figure above, only the head and torso tracks are defined, so in the
collapsed view for body only the 2/3 of the track are filled.
It is the same for the position track : as only the position on the floor is defined,
only the upper 1/2 of the collapsed track is filled.
| Using the keys |
- the key is symbolized with a red point.
On a key, a right click shows a popup menu allowing you to delete the key.

To delete several keys together, just collapse the tracks and use the popup menu only once : all the tracks with a key defined for the selected time will have theses keys destroyed. - the partial key represented by a transparent point show the
key defined inside an included figure.
- the initial key, the green point, record the initial position of a character (the position on the stage and the initial orientation and angles).
| Adding a figure |
A black rectangle will represent the size of the figure you want to drop. Releasing the mouse button will show the following window :

In the mapping, you can decide how to bind the character in the routine with the
character in your current routine.
When you choose a character already use in the mapping, as you can't applied to different
moves to the same character, the mapping using this character is swap with you selection.
|
To skip a character, just use the None mapping. |
If you choose to include the notes, they will be drawn in gray in the editor. This means you can't modify them. Just think of them as a background layer of notes. You call still add new notes in the editor, which will overwrite the included notes.
If you choose to include as keyframes, then the routine will not be stored
as a link to the figure but rather you will duplicate the figure and include all
the keyframes of the initial figure.
This can be useful in some situation, but you will loose all the power of Gepetto
as the improvements you could make later on the initial figure will not be
incuded ...
You can choose which part of a routine you want to include. To do this, you can use the Reject tab :

If Gepetto detects some conflicts when trying to add (not insert) a figure,
the corresponding tracks will be marked as rejected. Trying to uncheck them
will produce an error message when clicking on the OK button.
| The player |
The spin control on the left gives you the exact time (a beat in composed of 1000 ticks). You can edit it directly.
The shortcuts, available in all the windows, are :
- Space key to start and stop the playing.
- Alt-Space key to start and stop the playing in reverse direction.
| The Note editor |
The way notes are working is :
- create a note by clicking the left button and dragging the mouse to define the time range of the note.
- move a note by dragging the blue point (the cursor takes the form of a cross when the move function is available).
- resize a note by clicking somewhere on it (the cursor takes the form of an horizontal double arrow when the resize function is avalaible).
- edit a note by double clicking on it.
The edition (creation or modification) of a note will be done in the following window :

In the text zone you can type what you want, but :
![]() the Escape key will cancel the edition.
the Escape key will cancel the edition.
![]() the Shift-Return key or Control-Return key
will confirm the edition (same as if pressing the OK button).
the Shift-Return key or Control-Return key
will confirm the edition (same as if pressing the OK button).
The panel of buttons below the text zone are shortcuts to help you to enter
the comments quicker.
| The Property window |
- the name of the routine.
- the description of the routine.
- the copyright of the routine.
- the bpm (bars per minute) of the routine. This is used, with the kind of rhythm (3 or 4 beats per bar) to calculate the speed of the animation.
- a free text where you can enter whatever you want. This text is never used by Gepetto.


Copyright © 2000 Laurent Riesterer.
Last modified on Aug 14, 2000.