In this part, we will see how to install all the required software on the hard drive. Tools used during the installation
Given the hardware I used for my first e-frame, I had no way to install Linux directly from the laptop (no way to boot it). I decided to use an other PC to access directly to the harddrive.
I first used a 2.5'' HDD enclosure to connect the lpatop HDD to my PC. This worked but was not very convient, as I needed to unplug/replug the HDD each time I wanted to try something on the laptop. After some search, I bought this nice device called R-Driver II, very useful for geeks ...
I also used a Linux on my main PC (Suse 9.1) to access to HDD. If you don't have Linux running on your PC, you can use a live Linux to execute all the steps described below (one live version having all the required tools is INSERT -- ISO image is only 50 MB)
Simply boot your Linux, then connect your external laptop HDD. On my system, the disk was seen as /dev/sdc. This may change on your system: each time I refer to /dev/sdc, be sure to translate that to your system (e.g. /dev/sda).
Step 1: Formatting the HDD
First thing firsts, we will format the HDD using the following comands to create 2 partitions (one for swap, one for data).
The examplebelow is based on a 1.3GB disk.
suse91:/home/riesterer/work # fdisk /dev/sdc

Command (m for help): p

Disk /dev/sdc: 1358 MB, 1358991360 bytes
64 heads, 63 sectors/track, 658 cylinders
Units = cylinders of 4032 * 512 = 2064384 bytes

   Device Boot      Start         End      Blocks   Id  System
/dev/sdc1   *           1         657     1324480+   6  FAT16

Command (m for help): d
Selected partition 1

Command (m for help): n
Command action
   e   extended
   p   primary partition (1-4)
p
Partition number (1-4): 1
First cylinder (1-658, default 1): 1
Last cylinder or +size or +sizeM or +sizeK (1-658, default 658): +64M

Command (m for help): n
Command action
   e   extended
   p   primary partition (1-4)
p
Partition number (1-4): 2
First cylinder (33-658, default 33):
Using default value 33
Last cylinder or +size or +sizeM or +sizeK (33-658, default 658):
Using default value 658

Command (m for help): t
Partition number (1-4): 1
Hex code (type L to list codes): 82
Changed system type of partition 1 to 82 (Linux swap)

Command (m for help): p

Disk /dev/sdc: 1358 MB, 1358991360 bytes
64 heads, 63 sectors/track, 658 cylinders
Units = cylinders of 4032 * 512 = 2064384 bytes

   Device Boot      Start         End      Blocks   Id  System
/dev/sdc1               1          32       64480+  82  Linux swap
/dev/sdc2              33         658     1262016   83  Linux

Command (m for help): w
The partition table has been altered!

Calling ioctl() to re-read partition table.
Syncing disks.
Once done, we need to create the filesystems:
suse91:/home/riesterer/work # mkswap -c /dev/sdc1
Setting up swapspace version 1, size = 66023 kB
suse91:/home/riesterer/work # mkfs.ext3 -c /dev/sdc2
mke2fs 1.34 (25-Jul-2003)
Filesystem label=
OS type: Linux
Block size=4096 (log=2)
Fragment size=4096 (log=2)
157760 inodes, 315504 blocks
15775 blocks (5.00%) reserved for the super user
First data block=0
10 block groups
32768 blocks per group, 32768 fragments per group
15776 inodes per group
Superblock backups stored on blocks:
        32768, 98304, 163840, 229376, 294912

Checking for bad blocks (read-only test): done
Writing inode tables: done
Creating journal (8192 blocks): done
Writing superblocks and filesystem accounting information: done

This filesystem will be automatically checked every 21 mounts or
180 days, whichever comes first.  Use tune2fs -c or -i to override.
Step 2: Copying the files on the HDD
We can now copy all the files to this newly formatted disk. I have packaged a filesystem which can be downloaded here: http://laurent.riesterer.free.fr/root_eframe_i386.ext2.gz (8 MB). First uncompress the filesystem:
gunzip root_eframe_i386.ext2.gz
then mount it locally as a loopback filesystem:
mount -o loop root_eframe_i386.ext2 root_eframe
Copy all the files:
suse91:/home/riesterer/work # mount /dev/sdc2 /mnt/disk
suse91:/home/riesterer/work # cp -aR root_eframe/* /mnt/disk
suse91:/home/riesterer/work # ll /mnt/disk/
total 68
drwxr-xr-x 15 root root 4096 Mar 6 15:51 .
drwxr-xr-x 4 root root 96 Dec 15 16:39 ..
drwxr-xr-x 2 root root 4096 Feb 13 11:18 bin
drwx
Step 3: Make the HDD bootable
Before to put the HDD back in the laptop, we need to make it bootable. I choose to use GRUB for this task:
     GNU GRUB  version 0.94  (640K lower / 3072K upper memory)

  [ Minimal BASH-like line editing is supported.  For the first word, TAB
    lists possible command completions.  Anywhere else TAB lists the possible
    completions of a device/filename. ]

 grub> device (hd2) /dev/sdc
Once GRUB knows about our external drive, we proceed with a classic install:
grub> install (hd2,1)/boot/grub/stage1 (hd2) (hd2,1)/boot/grub/stage2 (hd2,1)/boot/grub/menu.lst

grub> embed (hd2,1)/boot/grub/e2fs_stage1_5 (hd2)
 23 sectors are embedded.
After that last operation, simply unmount your /dev/sdc2 partition, unplug your external drive and put the HDD back into the laptop. Turn the power on, and hopefully you will boot to Linux. If the program hangs on GRUB, just do an local install (on hd0 using the command line prompt displayed after the boot).
Step 4: Do some basic testing
At this point, you should have a e-frame-enabled laptop, with one big advantage: you still have the keyboard connected. This is the perfect time to make sure everything is working before to take the laptop apart.
Do the following testing:
- boot the laptop and wait until you get the login screen (as there is no photo by default, the slideshow program will exit right after being started). Log in as user
eframe, password eframe. At any time, you can become super user by issuing su (no password).
- when the wireless card is active, the network parameters will be (everything if configured in the file
/etc/init.d/S99local):
- Wireless in Ad-Hoc mode, ESSID
EFRAME, default channel 11, no encryption
- IP address:
10.0.0.1
- DHCP server for
10.0.0 sub-domain
- SSH daemon running
- Samba server (sharing the
photos directory
- switch off the laptop (using
shutdown). Plug one wireless card to see if it is correctly detected by the system. Reboot the laptop and look at the boot messages. The supported wireless cards are 16-bits PCMCIA (not cardbus):
- Belkin FD6020 v2 which can be found on eBay too. WARNING: there are 3 version, I am supporting only the version 2 (Amtel chipset). This is my preferred card as it works very well and comes with the nice
lvnet tool to configure/monitor the card.
- Netgear MA401 which seems to be discontinued by Netgear, can be found on eBay or on this shop. For this card, you need to edit the file
/etc/init.d/S99local and replace amtl0 by eth0.
- test the Wireless network from the laptop, then try to connect to the laptop using SSH. If this works, you are sure to be able to access your machine even when the keyboard will be removed.
To be continued ...
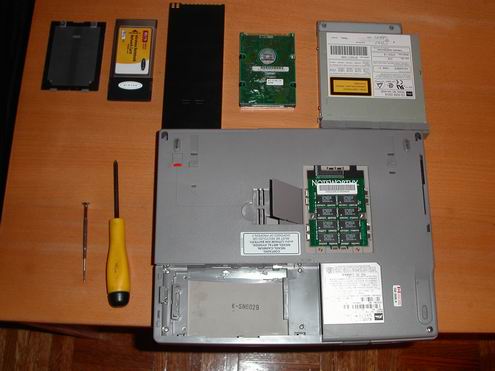
You now have a fully fonctionnal e-frame. In the next part, I will show how to transform the laptop into a real e-frame. Get your screwdriver ready !
]]>